Artosku Guide

Short steps for using Artosku. Your data stays on your own phone.

Start here

Four steps, about five minutes.

  1. Set up a wallet

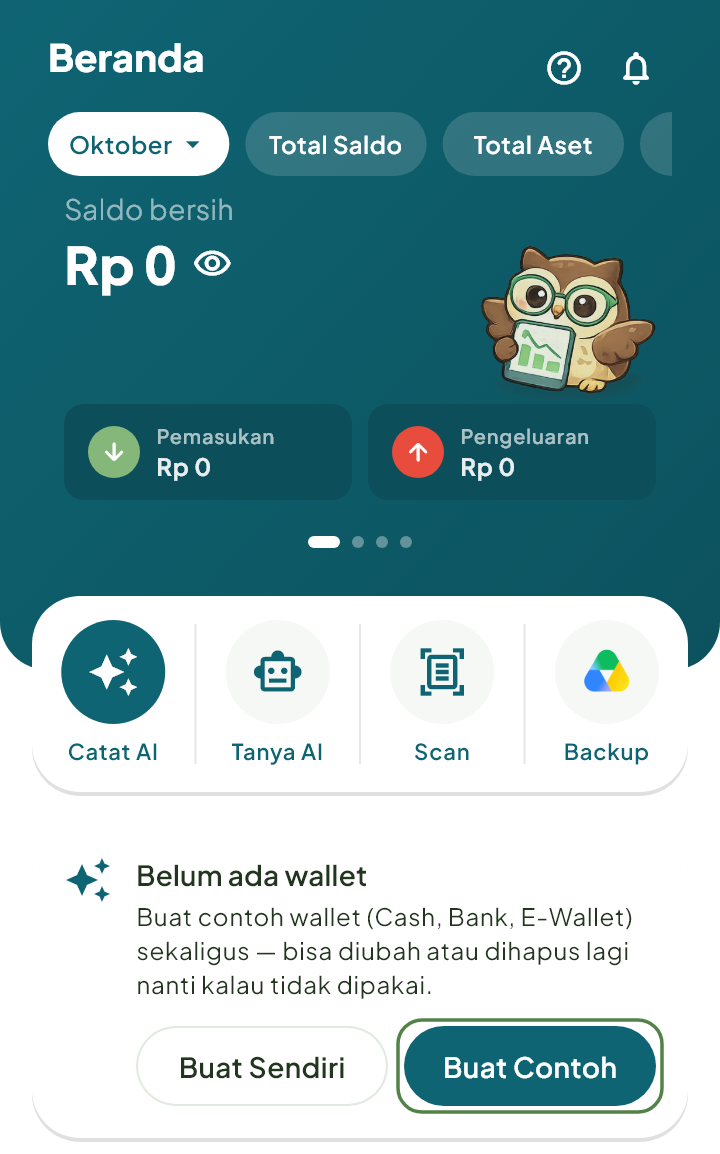
    A wallet is where your money lives: cash, a bank account or an e-wallet. On Home, if you have no wallet yet, tap Create Samples. Cash, Bank and E-Wallet wallets are made at once, and you can edit or delete them later. Want to make your own? Tap Create Your Own.

    Empty Home screen with Create Samples button highlighted
  2. Record your first transaction

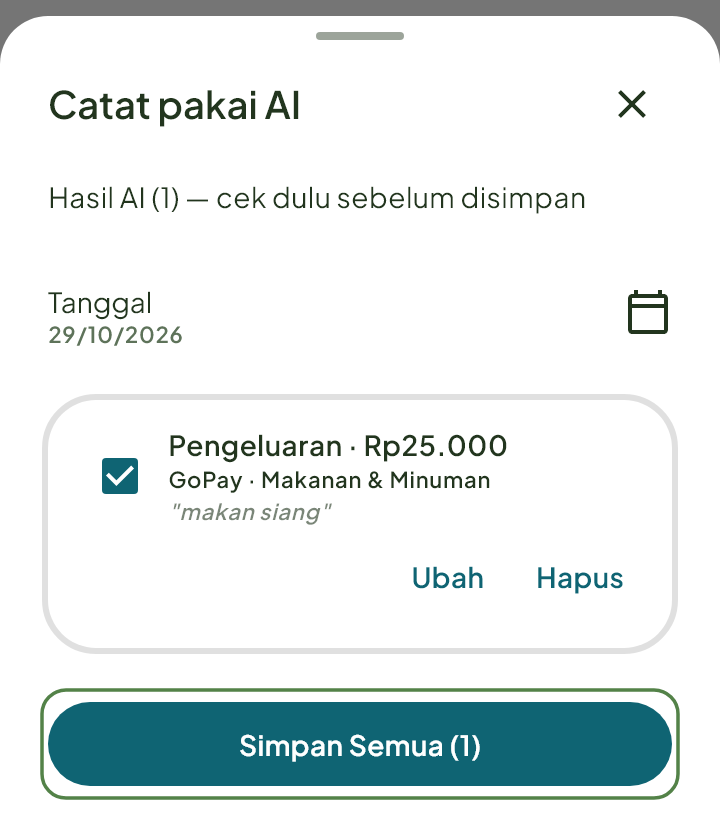
    With AI: tap the + button at the bottom middle, then Record with AI. Say or type, e.g. "lunch 25k". Check the result, then save.

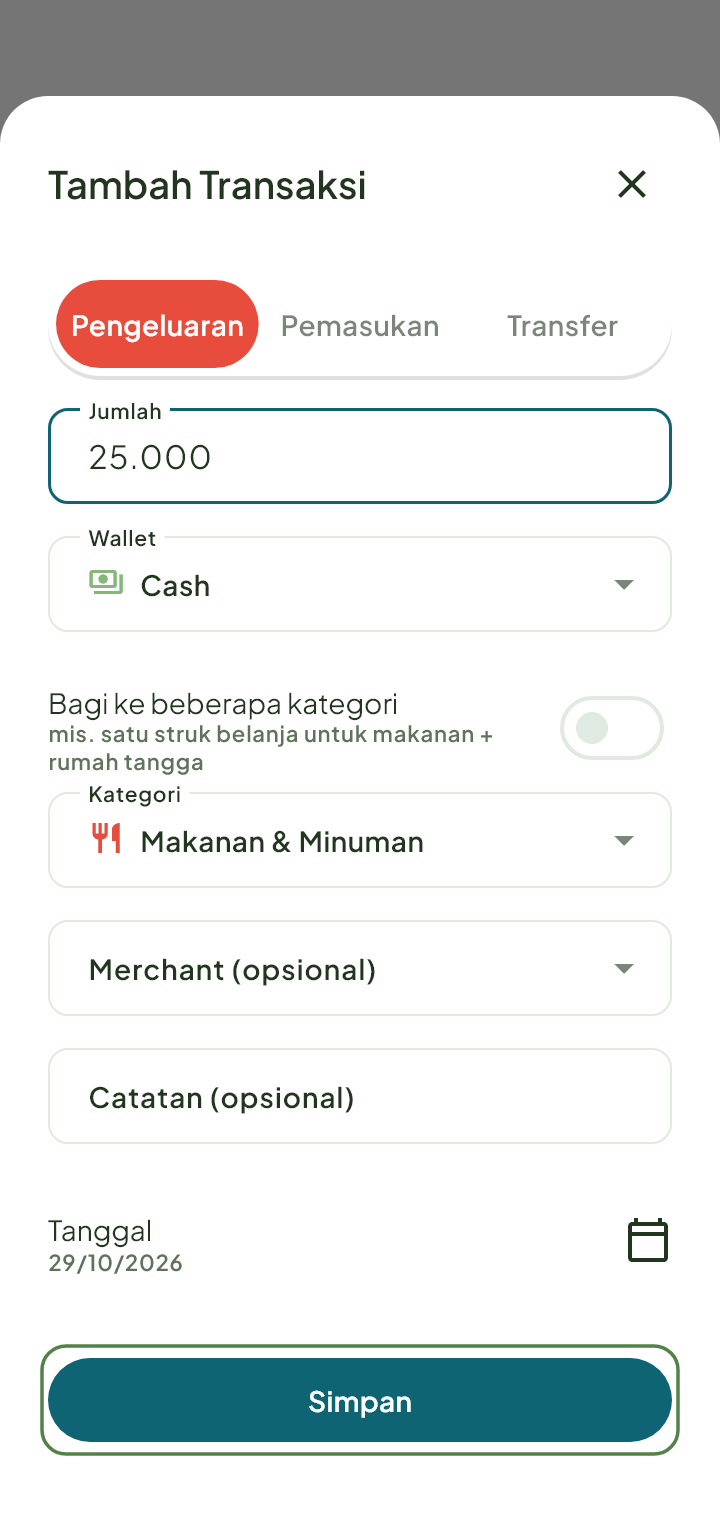
    By hand: tap +, pick Expense, Income or Transfer. Fill in the Amount, pick the Wallet and the Category, then tap Save.

  3. See the result on Home

    Go back to Home. Your total balance has changed. The daily allowance shows up here once you have made one (see the next step).

  4. What next

    Try Daily allowance (how much you can spend per day until payday), Budgets (a limit per category) and Backup to Google Drive (a copy of your data in your own Drive).

Recording money

Record transactions

Record money in and out with the + button in the middle. Pick the wallet, category and merchant.

  1. Tap the + button at the bottom middle, then pick Expense, Income or Transfer.
  2. Fill in the Amount, pick the Wallet and the Category (the merchant can stay empty).
  3. Tap Save.
Transaction form with Save button highlighted

Record with AI

Say or type "lunch 25k" and the AI prepares the transaction for you to check first.

  1. Tap the + button › Record with AI.
  2. Say or type the transaction, e.g. "lunch 25k with gopay". Several at once is fine.
  3. Check the result (amount, wallet, category) and tap Edit if something is off.
  4. Save.
Record with AI screen with results and Save All button highlighted

Scan receipts

Photograph a receipt and the items and total fill in. Shipping, fees and discounts are read too.

  1. Tap the + button › Scan receipt.
  2. Pick the wallet, then Take Photo or Gallery (several receipts are fine).
  3. Tap Process N Receipts and wait until the draft is ready.
  4. Check the items and categories, then save.

Add many transactions at once

Enter several transactions on one screen, or split one receipt over several categories.

  1. Tap the + button › Add many.
  2. Pick the Expense, Income or Transfer tab.
  3. Fill in row by row (date, wallet, amount, category). For one like an earlier one use Copy old transaction.
  4. Tap Save All.

Import a statement from PDF

Read a bank statement PDF into a list of transactions you can check and save.

  1. Open Transactions, tap the ⋮ menu › Import statement.
  2. Pick the wallet the statement belongs to.
  3. Pick the PDF or CSV statement file from the bank, then tap Process File.
  4. Check the list on the Statement Review page (category, date, amount), then Save All.

Capture from notifications

Bank and e-wallet notifications on your phone become draft transactions to approve. Android only.

  1. Open More › Catat Notif, tap Allow notification access and turn it on for Artosku.
  2. Tap Choose bank and wallet apps and pick the apps to watch.
  3. Tap Connect to a wallet so drafts go to the right wallet.
  4. When a bank or e-wallet notification comes in, a draft appears on the Catat Notif page. Check it, then Record all.

Watched bank apps and clearing notification drafts

Choose the bank apps that are watched, connect wallets, turn on new draft alerts, and delete drafts or notification data.

  1. Open More › Capture notifications, then tap Settings (the icon at the top right).
  2. Under Monitored apps tap Manage to pick the bank and wallet apps. Turn on Tell me about new drafts for an alert.
  3. Drafts not showing? Tap Not coming in? then Allow again for notification access.
  4. To clean up, tap Delete all drafts or Delete all notification data.

Transfer fee

Record the bank admin fee together with the transfer: one card, and the source wallet balance is right.

  1. Tap the + button › Transfer (or edit an existing transfer).
  2. Fill in the Amount, From wallet and To wallet.
  3. Fill in Transfer fee (optional), or tap 2,500 or 6,500. Empty or 0 means no fee.
  4. Pick the Fee category, then Save. The fee is recorded as an expense and shows on one card with its transfer.

Copy an old transaction

Record a similar transaction again in one tap, without typing it from scratch.

  1. Open an old transaction in the Transactions tab, then tap the Copy icon.
  2. Or in Add many, tap Copy old transaction and pick it (you can search and filter).
  3. Change what you need (the date is today by default), then save.

Combined receipt (many categories)

One shopping receipt becomes one transaction with its items and each item's category.

  1. Tap the + button › Scan receipt, then photograph the receipt. In the result pick Combine into 1 receipt so it becomes one transaction with the item details.
  2. Or enter it yourself: in the transaction form turn on Split across several categories, then fill in each row. The rows must add up to the total.
  3. Save. The item details are kept inside the transaction.

Wallets, categories & merchants

Wallets

Manage cash, bank accounts and e-wallets and their balances. Move money between wallets.

  1. Open More › Wallet, then tap Add Wallet.
  2. Pick the type (bank, e-wallet, cash) or Add Manually.
  3. Fill in the Wallet name and the Opening balance, then Save.

Pockets

Split the balance of one wallet into several pockets, e.g. Emergency fund or Holiday.

  1. Open More › Wallet and tap the wallet.
  2. Under Pocket tap Add Pocket (New Pocket). Fill in the Pocket name and the Initial allocation, then Create Pocket.
  3. Change what is in it any time with the pocket's ⋮ menu › Manage funds: Add, Reduce or Transfer to another pocket.

Move money between pockets

Move money from one pocket to another pocket or wallet, recorded neatly.

  1. Open More › Wallet, tap the wallet, then open Pocket.
  2. Tap Pocket transfer (or Manage funds › Transfer).
  3. Pick From and To (a pocket or a wallet), enter the Amount, then tap Transfer.

Currency

Pick your main currency and record wallets or transactions in another one, rates update daily.

  1. Open More › Currency.
  2. Tap Main currency, then pick the new currency (Change the main currency).
  3. Every total, budget and report then uses it. Rates update automatically each day.

Categories

Organise income and expense categories, down to subcategories.

  1. Open More › Categories.
  2. Tap add for a new category (pick Expense or Income, a name, an icon).
  3. Tap a category to edit it, or hold and drag to reorder.

Category learning

Artosku remembers the category you chose for a description, and you can change it.

  1. Open More › Category Learning.
  2. See the keywords Artosku has learned from your habits.
  3. Edit or delete the ones that are off, so the next transactions land in the right category.

Merchants

See where money goes and comes from, with a default category for each place.

  1. Open More › Merchants.
  2. Tap add, enter the place name and its usual category.
  3. When recording, pick that merchant and the category fills itself in.

Budgets & allowance

Budgets

Set a spending limit per category each month and see what is left.

  1. Open More › Budget.
  2. Tap add, pick a category, pick the Period (Daily, Weekly or Monthly) and enter the limit.
  3. Artosku tells you when spending gets close to or passes the limit.
  4. Want to change the period (e.g. monthly to weekly)? Tap the budget, pick Daily, Weekly or Monthly while editing, then Save and Change. The old budget is replaced; other months or weeks are not touched.

Daily budget (a limit per category each day)

A spending limit per category for each day, with special rules for certain days (e.g. Friday or the weekend) or one date. Different from the Daily allowance, which is worked out for you from all your money.

  1. Open More › Budget, then tap the + button in the header.
  2. Pick the Category (e.g. Snacks), then Period: Daily. Fill in Limit per day (general, all days).
  3. For certain days tap + By day: pick the days (e.g. Sat and Sun), fill in the limit or turn on No limit, then Save. For one date tap + By date.
  4. What is used: date > day > general. Save. See it in the Daily tab (the ‹ › arrows move the day, up to 30 days ahead) or on the Today's budget card on Home.
  5. Different from the Daily allowance: the allowance is worked out for you from all your money until payday, the daily budget is a limit per category that you set yourself. You are reminded once when the limit of that day is passed.

Daily allowance

Work out how much you can spend per day until payday, with your mascot.

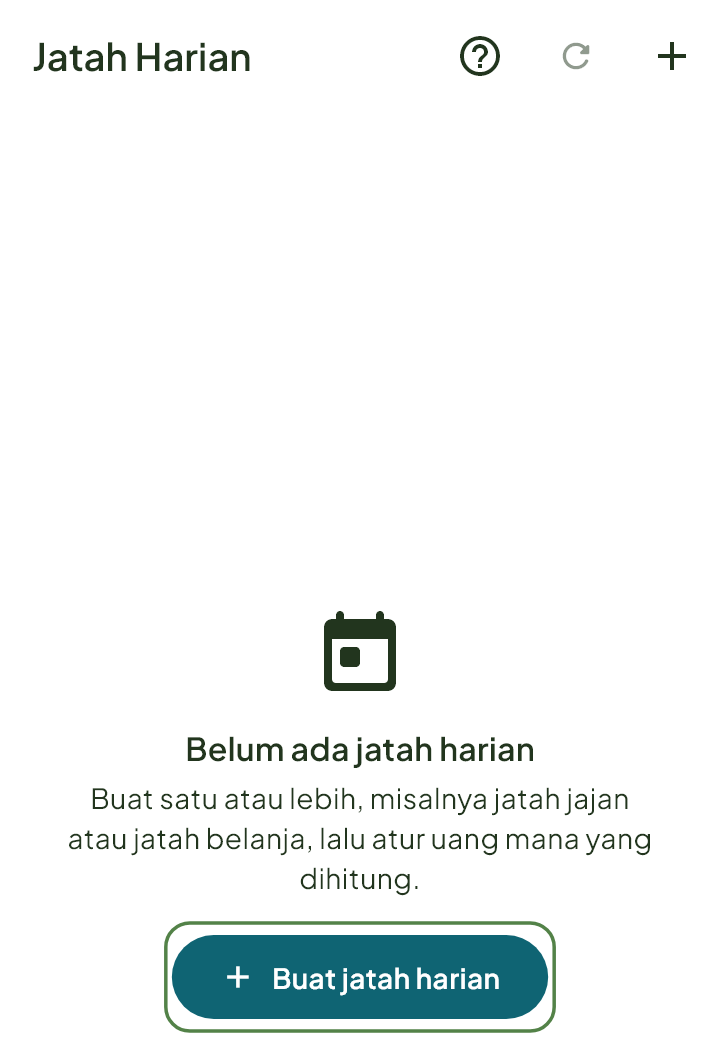
  1. Open More › Daily Allowance, then tap Create daily allowance.
  2. Enter the Allowance name (e.g. Snack allowance) and create it.
  3. Tap Set up calculation to choose which money counts: wallets or pockets, recurring bills, due debts, savings deposits, regular income.
  4. The result (how much you can spend per day until payday) shows on Home. Turn off Show on home if you do not want it.
  5. Want a limit per category each day that you set yourself? That is the Daily budget: More › Budget › the Daily tab.
Empty Daily Allowance screen with Create daily allowance button highlighted

Leave a transaction out of the allowance

A big purchase or money held for someone else does not use up the daily and weekly allowance. Choose per transaction: spread over the days that are left, or ignored completely. It can be undone at any time.

  1. One transaction: tap it (on Home or in History), then tap Leave out of allowance. If you have more than one allowance, pick the allowance first.
  2. Pick How to count: Spread over the days left (today's allowance is not used up at once, the allowance of the next days goes down a little) or Ignore completely (as if the transaction never happened, careful: the allowance can be bigger than the money you have). Then tap Leave out. An income that is left out is always Not counted: it adds nothing to the allowance.
  3. Many at once: More › Daily Allowance › pick your allowance › Excluded transactions › + Add transaction. Search note, category, merchant or amount, set 30 days / This month / Pick dates, tick the ones to leave out, tap Save · {n} selected, then pick How to count.
  4. Want to undo? In the transaction detail tap Undo exclusion. Or in the Excluded transactions list: tap the row then Release, swipe the row, or open + Add transaction, untick it and Save.
  5. It applies to both the Daily and the Weekly view. The number shows in the allowance formula as "{n} transactions left out".

Recurring transactions

Regular bills and subscriptions are recorded on their date, with reminders.

  1. Open More › Recurring Transactions, then tap Add recurring transaction.
  2. Pick Expense or Income (a transfer type is not available here), fill in the Amount, the wallet (down to its pocket), the Category and the Note.
  3. Pick the Frequency: Daily, Weekly, Monthly or Yearly, then Start from the date and Remind how many days before.
  4. Save. Artosku records it automatically around 00:00 each time it falls due, or when you open Artosku, and reminds you. The note is dated the day it was due.

Report period (payday)

Choose when "this month" starts, for example on payday.

  1. Open More › Report Period.
  2. Turn on Custom period start date, then fill in Start date with your payday (a number 1-28, e.g. 25).
  3. "This month" in Transactions, Reports and Home then runs from that day. The date range shows under the field.
  4. Turn the switch off to go back to the normal calendar (the 1st to the end of the month).

Debts & installments

Debts & receivables

Record who borrowed, how much and when it is due. Due-date reminders, and it can be paid in parts.

  1. Open More › Debts & Receivables.
  2. Tap add, then choose whether you owe or someone owes you.
  3. Fill in the name, the amount, the Date (the day the money changed hands, it can be in the past but not the future) and the due date.
  4. Save. To pay, tap Paid off (receivable) or Pay (debt) in the same list and set the Payment date if it was not today.

Installments & Paylater

Record installments, credit and paylater bills so you know what is left and when it is due.

  1. Open More › Installments, then tap Add installment.
  2. Fill in the Installment name (e.g. Motorbike, Phone), Total, How many payments, the Installment payment period and the First installment date.
  3. Pick Taken from wallet and a Category, then Save. Installments are recorded automatically on each due date.
  4. Pay early or see what is left with the Pay button on the installment card.

Arisan (rotating savings)

Record your arisan: dues run automatically each period and the pot you receive is recorded on your turn.

  1. Open More › Installments, then tap Add installment.
  2. Enter the Installment name (e.g. Neighborhood arisan), then turn on This is an arisan.
  3. Fill in the Number of members (how many payments), Dues each period, the Installment payment period and the First installment date.
  4. Fill in Your turn to receive the pot (which payment), then pick Taken from wallet and the Category of the dues.
  5. Save. The dues are recorded automatically on each due date, and the pot you receive is recorded as income on the date of your turn.

Paylater (buy now, pay later)

A purchase on a paylater wallet becomes an installment automatically, and the bill is paid from another wallet.

  1. Open More › Wallet, tap Add Wallet, pick the type (or Add Manually), then turn on Paylater wallet. Fill in the Paylater limit (optional).
  2. Record the purchase as usual with that paylater wallet. Under Installment details you can pick the number of installments and the wallet that pays the bill.
  3. The purchase becomes an installment automatically, following its term. See it in More › Installments.
  4. Pay the bill: in Installments tap Pay this month's bill, then pick Pay from wallet. The money moves from that wallet to the paylater wallet.

Savings, assets & shopping

Savings goals

Set a savings target, put money aside bit by bit and watch the progress.

  1. Open More › Savings Goals, then tap add (New Savings Goal).
  2. Fill in the Goal name, the Target amount and the Target date (optional).
  3. Link a pocket so the money in it counts as your savings (More › Wallet › pick a wallet › Pocket).
  4. Follow the progress on the same page.

Assets

Record valuables or investments and follow their value over time.

  1. Open More › Assets.
  2. Tap add, enter the asset name and its value now.
  3. Update the value any time so your net worth stays right.

Shopping list

Write a shopping list, tick what you bought, then record it as a transaction.

  1. Open More › Shopping List, then tap + and pick New list (enter the List name).
  2. Tap Add item… and fill in the items. You can enter prices for an estimated total.
  3. Tick the items that are in the basket while you shop.
  4. Tap Finish shopping, then choose Record as 1 transaction or Scan receipt.

Item usage

Record items used up or thrown away to see how fast your shopping is used.

  1. Open More › Item usage.
  2. Search or add an item, then tap it to record Used up. Pick Wasted or Given away when it was not used up.
  3. See Summary for which items run out fast and how much was wasted this month.

Reports

Reports

See money in and out by category and month, with charts and comparisons.

  1. Open the Reports tab.
  2. Pick the period (month, year, all, or custom).
  3. Tap a category or wallet to see its transactions, or export the report.

Sharing with others

Split a bill

Split a shared bill between friends, work out each share and record yours.

  1. Open More › Split Bill.
  2. Enter the name (e.g. Dinner), the Bill total, the wallet that paid and the category.
  3. Tap Add person for each friend, then pick Split equally or fill in each share. Turn on I am part of the split if you ate too.
  4. Save. Your share is recorded as an expense, your friends' shares become receivables under Debts & Receivables.

Shared wallets

One wallet shared by two people or a family, every member can record.

  1. Open More › Shared Wallet, then tap Create Shared Wallet.
  2. Pick the wallet to share and name it, then Make Shared Wallet.
  3. Invite your contacts from the wallet page. Members see the balance and transactions, the notes stay on each phone.

Invite people to a Shared Wallet

Bring friends or family into one shared wallet with an invitation.

  1. Connect your friend's account first in More › Contacts.
  2. Open More › Shared Wallet › the wallet, then invite your contact.
  3. Your friend opens Shared Wallet, sees Invitation for you, and taps Join.

Contacts

Keep friends you often send to or bill, so they are quick to pick.

  1. Open More › Contacts.
  2. Tap add and send an invitation to your friend, or accept one that came in.
  3. Once connected you can send money to each other and make a Shared Wallet.

Send transactions to each other

Send transaction records to a friend who also uses Artosku, and receive theirs.

  1. Connect your friend's account first in More › Contacts.
  2. Open More › Send Money, then tap Send Money or Request Money.
  3. Pick the contact, enter the amount and (to send) pick the source wallet and the category.
  4. Tap Send. The money only arrives when your friend accepts, and comes back if declined.

Backup & restore

Google Drive backup

Your data stays on your phone and can be backed up to Google Drive for a new phone.

  1. Open More › Google Drive Backup, then tap Connect and pick the Google account. The link is remembered: signing out and back in to the same account does not need connecting again.
  2. Tap Back up now (or turn on Automatic backup) and pick the slot. Every profile is included: Personal and business. The Backup button on Home is always for backing up, never for restoring.
  3. To restore, tap Restore data (the screen is red), pick the backup, read the comparison of the backup and the data on the phone (including how many transactions would be lost), then tap Continue restoring. Want a backup first? Tap Back up first.
  4. Last confirmation: type PULIHKAN, leave Save a copy of the current data first ticked, then tap Restore now. The data on the phone is replaced completely, not merged. After Connect, a restore is only offered right away on a phone that is still empty (a new phone).
  5. Restored by mistake? On Home there is a Data restored card: tap Undo restore then Revert (it is also in More › Google Drive Backup). It works for up to 7 days. Transactions recorded after the restore are lost too.

Automatic backup to Google Drive

Turn on Automatic backup, connect or disconnect the Google Drive account, and restore from an old backup.

  1. Open More › Google Drive backup, then tap Connect and pick the Google account.
  2. Turn on Automatic backup. Tap Back up now any time for a manual backup.
  3. To restore, tap Restore data and pick the backup (Automatic backup or a Slot). You see the backup and the data on the phone side by side, how many transactions would be lost, then you have to type PULIHKAN.
  4. Restored by mistake? Tap Undo restore (the card on Home or on this screen), then Revert. The copy of the data from before the restore is kept for 7 days.
  5. Tap Switch account to use another Drive account, or Disconnect to cut Google Drive off (the backup files on Drive are not deleted).

Excel export & import

Save transactions to an Excel file, or bring them in from Excel.

  1. Open More › Excel Export & Import.
  2. Tap Back up now to make the Excel file. It holds only the profile in use (Personal or one business).
  3. To restore, tap Restore and pick the file. You are told how many transactions would be lost, then you have to type PULIHKAN. Only the data of the profile in use is replaced, and a copy of the data before is kept for 7 days (Undo restore on Home).

Automatic Excel backup to the Download folder

Save an Excel backup by itself to the phone Download folder, daily, weekly or monthly.

  1. Open More › Export & Import Excel.
  2. Turn on Save Excel to Download folder.
  3. Turn on Automatic Excel backup and pick Manual, Daily, Weekly or Monthly. The file lands in the phone Download folder.

Import an older Excel file or restore from Excel

Restore everything from an Excel backup file, or add data from an older Excel file.

  1. Open More › Export & Import Excel.
  2. Tap Restore and pick the Excel backup file: the data of the active profile is replaced. You are told how many transactions would be lost, then type PULIHKAN. A copy of the data before is kept for 7 days (Undo restore on Home).
  3. For an older Excel file, pick it and tap Add Data: the data is added and what is there stays.

AI Chat & AI

Ask Artosku AI

Ask about your money or how to use Artosku. The AI can also prepare transactions for you to approve.

  1. Tap the floating AI button.
  2. Type or say your question, e.g. "how much did I spend this month?" or "how do I make an arisan".
  3. The AI answers from your data or explains a feature, and can prepare a transaction for you to approve first.

AI usage & vouchers

See how much AI quota is left today and your extra vouchers.

  1. Open More › AI Usage.
  2. See how much of today's AI allowance is left and when it resets.
  3. Have a voucher? Enter its code on the same page.

AI consent (allow or withdraw)

Allow or withdraw the AI features. When withdrawn, the AI features stop until you allow them again; the rest is not affected.

  1. Open More › AI consent.
  2. Turn Allow AI features on or off (AI recording, AI chat, receipt scan, statement upload, category icon suggestions).
  3. When off, the AI features stop until you allow them again. The rest is not affected.

Streak & mascot

Streak & your mascot

Record every day to keep your streak, open gift boxes and look after your mascot's home.

  1. Record at least one transaction each day to keep your streak.
  2. Open More › Streak to see your streak, gift boxes and your mascot's home.
  3. Collect coins and spend them in the Shop.
  4. Freezes: every 7 days in a row you get +1 freeze, good for 14 days from the day you get it (an unused one is gone). If you miss a day, one freeze is used automatically (the one that runs out first) and the streak keeps going. With no active freeze, the streak breaks.
  5. See your active freezes and how long each one lasts in More › Streak, the Freeze section.

Mascot item shop

Trade streak coins for hats, accessories and decorations for your mascot.

  1. Open More › Streak › Shop.
  2. Pick an item (hat, accessory, decoration) and trade it for streak coins.
  3. Dress your mascot with it from Collection.

Mascot collection

See every item you own and dress your mascot with it.

  1. Open More › Streak › Collection.
  2. See every item you own.
  3. Tap an item to dress your mascot with it.

Settings & account

App lock (PIN & biometrics)

Lock Artosku with a PIN, fingerprint or face so nobody else opens your records.

  1. Open More › App Lock (PIN).
  2. Tap Set PIN, create a new PIN, then confirm it.
  3. Turn on Unlock with Biometrics to use your fingerprint or face.
  4. To change the PIN tap App Lock (PIN) again. To switch it off, tap Turn off PIN.

Appearance, language & theme

Switch between Indonesian and English, text size, and dark or light mode.

  1. Open More › Appearance.
  2. Pick the Display Mode (System, Light or Dark) and the Colour Theme.
  3. Drag Text Size to make the text bigger or smaller.
  4. Pick the language (Indonesian or English) under Language. The Arrange Home row on this page opens the Home settings.

Arrange Home

Choose which parts of Home show and put them in your order.

  1. Open More › Arrange Home.
  2. Hold and drag the Home sections to reorder them.
  3. Turn off the sections you do not want to see. Tap Restore defaults to bring back the original order.
  4. You can also open it from More › Appearance › Arrange Home. Each profile (Personal or a business) has its own arrangement.

Phone home-screen widget

Put an Artosku widget on your phone screen to see a summary and record fast.

  1. Hold your phone's home screen and pick Widgets.
  2. Find Artosku and pick the widget you want.
  3. Place it on the home screen. Tap it to record straight away or open Artosku.

Pro & Max plans

A bigger AI quota and Business Mode. Pick the plan that suits you.

  1. Open More › Subscription.
  2. Compare the Pro and Max plans, then pick one.
  3. Complete the payment through Google Play.

Announcements

News and outage notices from the Artosku team.

  1. Open More › Announcements.
  2. Read the latest news from Artosku.

Guide center

Short guides for each menu that you can replay any time.

  1. Open More › Guide Center.
  2. Pick the menu you want to learn and follow the guide.
  3. Many screens also have a ? icon for that screen's guide.

Treat us a matcha

If Artosku is useful, you can treat the team to a matcha.

  1. Open More › Buy us a Matcha.
  2. Pick an amount and pay through Google Play.

Switch account

Switch between the accounts saved on this phone without signing in again.

  1. Open More › Switch profile.
  2. Tap Switch account and pick a saved account, or add another one.
  3. Each account has its own data on this phone.

Privacy policy & terms

Read how your data is protected and the rules of using Artosku.

  1. Open More › Privacy Policy to read how your data is protected.
  2. The Terms and Conditions are in the same menu, under Help & Info.

Unlock with fingerprint or face

Once a PIN is set, open Artosku with just your fingerprint or face.

  1. Set a PIN first under More › App Lock (PIN) › Set PIN.
  2. Once the PIN is on, the Unlock with Biometrics switch appears under it. Turn it on.
  3. The switch only appears when your phone has a fingerprint or face unlock.

Turn off the PIN or app lock

Remove the PIN so Artosku opens without a lock again.

  1. Open More. The red Turn off PIN button is under App Lock (PIN), only while a PIN is on.
  2. Tap Turn off PIN. Artosku opens without a lock again.
  3. To change the PIN, tap App Lock (PIN) and make a new one.

Account password (change or add)

Change your account password, or add one if you signed in with Google so you can sign in with email too.

  1. Open More, then tap Change Password. If you signed in with Google and have none yet, the row is called Add Password.
  2. Fill in the New password (at least 6 characters) and Confirm password.
  3. Tap Save.

Change your name and profile photo

Change your nickname, pick a profile photo, or hide the name and email on the profile card.

  1. Open More. On the profile card at the top tap the pencil icon (Rename), or Add Name if there is none.
  2. Write your Nickname and tap Save.
  3. For the photo, tap it and pick a picture. Tap Hide to hide the name and email (View profile to show them again).

Sign out

Sign out of your Artosku account on this phone.

  1. Open More, scroll down, then tap Sign out.
  2. Your transactions stay on this phone. To switch to another account without signing out, use Switch account.

Start over (delete all data, keep the account)

Delete all transactions and financial data in this account and start from empty. The account stays.

  1. Open More, scroll down, then tap Reset Account and press and hold Hold to Reset Account until it finishes (Keep holding...).
  2. All transactions, wallets, categories, budgets, assets and debts in this account are deleted for good. The account stays.
  3. If unsure, make a Google Drive backup first.

Delete account

Delete your account and all its data from this phone for good.

  1. Open More, scroll down, then tap Delete Account.
  2. Type HAPUS to confirm, then tap Delete Account.
  3. The local data of this account is deleted too and cannot be brought back. To only empty the data, use Reset Account.

Search the menu in More

Find a menu by typing its name. If nothing is found, a button asks Artosku AI instead.

  1. In More tap the magnifier icon at the top right.
  2. Type the name of the menu, e.g. pin or payday. The list narrows as you type.
  3. If nothing is found, tap Ask Artosku AI.

Manage, cancel or restore a subscription

See your plan, switch between monthly and yearly, manage it in the Play Store, and restore purchases.

  1. Open More › Subscription. Current plan shows your plan.
  2. Pick Monthly or Yearly, then tap the plan to move up.
  3. Tap Manage subscription to cancel or change it in the Play Store. After cancelling the plan stays active until it runs out.
  4. New phone or purchase not read? Tap Restore purchases.

Terms and Conditions

Read the rules for using Artosku.

  1. Open More › Terms and Conditions.
  2. Read the rules for using Artosku. The Privacy Policy is the menu next to it.

Replay the guides or turn off automatic guides

Replay all guides, or turn off the guides that appear by themselves when a menu opens.

  1. Open More › Guide Center.
  2. Turn off Show guides automatically if guides pop up too often.
  3. Tap Repeat all guides: every guide shows again when its menu opens. Guides you saw are marked Seen.

Handbook (full tutorials)

Full tutorials for every feature on the website, with a search box. Opens in the browser.

  1. Open More › Handbook. The website opens in the browser.
  2. Look up the feature you want to learn in the search box, or pick from the Start here list.
  3. Want a short guide played right on a menu screen? That is the Guide center, or the ? button of that menu.

Follow Artosku on social media

@artosku on Instagram, TikTok, Threads and YouTube.

  1. Open More › Follow Artosku.
  2. Pick Instagram, TikTok, Threads or YouTube (@artosku).

Feedback and suggestions

Send feedback to the Artosku team by email.

  1. Open More › Feedback.
  2. Your email app opens with the address and subject filled in. Write your feedback and send.

What is new in this version (update notes)

See what is new in the version of Artosku you use.

  1. Open More › Update notes.
  2. Read the list of what is new in this version.

Rate Artosku on Google Play

Tell others about your experience with Artosku on Google Play.

  1. Open More › Leave a review.
  2. Google Play opens. Give stars and write your experience.

Check for an app update

See whether a newer version of Artosku is available, then update.

  1. Open More › Check for updates.
  2. When there is a new version, it says Version ... is available and a red dot sits on the row. Tap it to update through Google Play.

Quick how-tos for common goals

A weekly allowance

  1. On the Home, on the Allowance card, tap Weekly beside "Allowance per day" (or the Daily allowance ▾ tab › Show per week).
  2. This week's allowance is the money available divided by the days left to payday, for the days of that week (Monday to Sunday). The last week before payday counts only the days that are left.
  3. The card shows Left this week, Spent, and Safe per day. Tap Daily to go back; the choice is kept for each allowance.
  4. Want a weekly limit per category (e.g. snacks)? More › Budget › the Weekly tab.

A weekly budget for one category

  1. Open More › Budget, then tap the + button in the header.
  2. Pick the Category, then Period: Weekly. Fill in Limit per week (a week counts Monday to Sunday) and Save.
  3. See it in the Weekly tab; the › arrow goes to next week (up to 8 weeks). Copy last week is the copy icon in the title.
  4. A category can have a monthly AND a weekly limit; they stand apart and are never added. You are reminded at 90% and when it is passed.

Limit snacks per day, different on the weekend

  1. Open More › Budget, then tap the + button in the header.
  2. Pick the Category (e.g. Snacks), then Period: Daily. Fill in Limit per day (general, all days), e.g. 20,000.
  3. Tap + By day, pick Sat and Sun, fill in the weekend limit (or turn on No limit), then Save. Just one date? + By date.
  4. Tap Save in the form. What is used: date > day > general. See it in the Daily tab or on the Today's budget card on Home; you are reminded once when the limit of that day is passed.

A big purchase should not use up today's allowance

  1. Record the purchase as usual first, so your wallet balance stays right.
  2. Tap the transaction (on Home or in History), then tap Leave out of allowance.
  3. Pick How to count: Spread over the days left (the default, good for a big purchase now and then) then tap Leave out.
  4. Today's allowance is not used up at once. Your balance did go down, so the allowance of the days until payday goes down a little. Want it as if it never happened? Pick Ignore completely, but the allowance can then be bigger than the money you have.
  5. Changed your mind? In the transaction detail tap Undo exclusion.

Monthly pocket money for a child or partner

  1. Open More › Recurring Transactions, then tap Add recurring transaction.
  2. Pick Expense, fill in the Amount, the source wallet and a Category (e.g. Pocket money). Add a Note, e.g. "Pocket money for Rani".
  3. Pick Frequency Monthly (or Weekly), set Start from to the day you usually give it, and Remind how many days before.
  4. Save. Artosku records it automatically on each due date and reminds you. You still hand over the money yourself.

Saving every payday

  1. Make the goal: More › Savings Goals, tap add (New Savings Goal). Fill in the Goal name, the Target amount and the Target date. Artosku works out "Set aside ≈ … per month".
  2. Set a fixed reminder: More › Recurring Transactions › add, an Expense of that amount with a savings Category, Frequency Monthly, Start from your payday.
  3. When the reminder comes, move the money to your savings account or pocket, then tap Save in Savings Goals.
  4. Note: Artosku cannot move money between wallets by itself yet; only the recording and the reminder are automatic.

Paying rent every month

  1. Open More › Recurring Transactions, then tap Add recurring transaction.
  2. Pick Expense, fill in the Amount, the wallet that pays and a Category (e.g. Rent). Add a Note, e.g. "Room rent".
  3. Pick Frequency Monthly and set Start from to the payment day (e.g. the 1st). Slide Remind how many days before.
  4. Save. Each month the payment is recorded automatically on that day, and you are reminded beforehand.

Recording your salary automatically

  1. Open More › Recurring Transactions, then tap Add recurring transaction.
  2. Pick Income, fill in your salary Amount, the wallet that receives it and the Salary Category.
  3. Pick Frequency Monthly and set Start from to your payday. Save.
  4. Each month the salary is recorded automatically on that day. If your salary changes, change the amount with Edit.

A monthly food budget with a warning

  1. Open More › Budget, then tap add (Set Budget).
  2. Pick the category (e.g. Food) and fill in the Limit per month.
  3. Save. Follow what is used on the Budget page; Artosku tells you once when spending reaches 90% of the limit.
  4. Note: this is a monthly limit. Want a weekly one? Pick Period: Weekly in the same form.

An emergency fund

  1. Open More › Savings Goals, tap add (New Savings Goal).
  2. Fill in the Goal name (e.g. Emergency Fund), the Target amount (usually 3 to 6 times your monthly spending) and a Target date if you have one.
  3. Each time you set money aside, tap Save on the goal card. Artosku shows "Set aside ≈ … per month" and whether you are On track.
  4. Want the money apart from your normal balance? Make an Emergency Fund pocket in your wallet (More › Wallet › the wallet › Add Pocket) and link it to this goal.

Keeping household shopping money apart

  1. Open More › Wallet, tap the wallet that holds your shopping money, and under Pocket tap Add Pocket.
  2. Fill in the Pocket name (e.g. Household shopping) and an Initial allocation of the month's shopping money, then Create Pocket.
  3. Each time you shop, record the expense and pick that pocket under the wallet. What is left shows on the pocket.
  4. Shopping with a list: More › Shopping List, then Finish shopping › Record as 1 transaction.

An installment for a phone or motorbike

  1. Open More › Installments, then tap Add installment.
  2. Fill in the Installment name (e.g. Phone or Motorbike), the Total, How many payments, the Installment payment period and the First installment date.
  3. Pick Taken from wallet and a Category. Open Advanced details if there is Interest or a Late fee. Save.
  4. Each due date the installment is recorded automatically; see what is left on the card and pay early with the Pay button.

Recording a monthly subscription

  1. Open More › Recurring Transactions, then tap Add recurring transaction.
  2. Pick Expense, fill in the Amount, the wallet or card that is charged and a Category (e.g. Subscriptions). Put its name in the Note (e.g. "Movie streaming").
  3. Pick Frequency Monthly (or Yearly) and Start from the bill date. Remind 1 or 2 days before.
  4. Save. Each bill is recorded automatically; delete or edit it from the list when you stop subscribing.

Splitting a meal with friends

  1. Open More › Split Bill.
  2. Enter the name (e.g. Dinner), the Bill total, the wallet that paid and the category.
  3. Tap Add person for each friend, then pick Split equally. Turn on I am part of the split if you ate too.
  4. Save. Your share becomes an expense, your friends' shares become receivables under Debts & Receivables that you can collect through WhatsApp.

Recording a debt with a friend and being reminded

  1. Open More › Debts & Receivables, then tap Add debt/receivable.
  2. Pick Receivable (your friend owes you) or Debt (you owe). Fill in the name, Amount and Due date.
  3. Fill in the WhatsApp number (optional) to send a bill reminder. Pick a wallet if the money just moved, leave it empty if this is only a note.
  4. Save. Artosku reminds you near the due date, and on the card tap Remind to send a WhatsApp message. When it is paid, tap Pay.

Monthly shopping with a shopping list

  1. Open More › Shopping List, tap + and pick New list (enter the List name). An old list can be used again with Repeat.
  2. Tap Add item… and fill in the items, with prices if you know them for an estimated total.
  3. While shopping, tick the items that are in the basket.
  4. Tap Finish shopping, then Record as 1 transaction (or Scan receipt) so the spending goes into your wallet.

Tracking what runs out fast

  1. Open More › Item usage.
  2. Whenever something runs out, search for it and tap it to record Used up (pick Wasted or Given away if it was not used up).
  3. Open Summary and look at How fast it runs out: how many days each item lasts, and Wasted for what was thrown away.
  4. Use it to plan your next Shopping List.

Seeing your biggest spending this month

  1. Open the Reports tab and pick the period (this month).
  2. See spending per category; tap a category to see its transactions one by one.
  3. Want a direct answer? Ask KuAI with the AI button: "what was my biggest spending this month?".

Exporting your data to Excel

  1. Open More › Excel Export & Import.
  2. Tap Back up now. The Excel file is made and saved to the Download folder (turn on Save Excel to the Download folder) or you pick where it goes.
  3. It holds only the profile in use (Personal or one business). Want every profile? Use Google Drive Backup.
  4. For a report that is easy to read, open the Transactions or Reports tab.

Moving your data to a new phone

  1. On the old phone: More › Google Drive Backup, tap Connect then Back up now. Every profile is included (Personal and business).
  2. On the new phone: install Artosku and sign in with the same account.
  3. Open More › Google Drive Backup, tap Connect with the same Google account. On a phone that is still empty you are offered a restore right away: pick the backup then tap Restore.
  4. Receipt and product photos come along with Google Drive Backup, not with Excel.

Restored the wrong data, putting it back

  1. On Home tap Undo restore on the Data restored card. Closed the card? Open More › Google Drive Backup, the card is there.
  2. Read the comparison of Old data and Now, and how many transactions recorded after the restore would be lost. Then tap Revert.
  3. The data from before the restore is put back completely (nothing is merged). The copy is kept for 7 days from the restore; after that it cannot be undone any more.

Using two currencies (a USD wallet)

  1. Open More › Wallet, tap Add Wallet, pick the type (or Add Manually).
  2. Fill in the Wallet name, change its currency to USD and fill in the Opening balance. The rate to your main currency fills in by itself and you can still change it.
  3. Record transactions in that wallet as usual; totals are worked out in your main currency. Changing the main currency is in More › Currency.
  4. Moving between currencies: transfer from a rupiah wallet to the USD wallet, then fill in Amount received.

Business Mode

Business Mode Pro

A cashier, ingredient purchases, receipts over WhatsApp, buyers who have not paid and profit-and-loss reports. Business money stays apart from personal money.

  1. Open More › Switch profile.
  2. Pick your business, or create a new one if you have none.
  3. Home, Sales, Reports and the More menu become the business's. Business money stays apart from personal money.

Cashier (Sell) Pro

Pick products, take cash, QRIS, transfer or pay later, then send a receipt. Barcode scanning works.

  1. On the Business Home tap Sell.
  2. Tap a product to add it to the basket (or Custom item, Scan barcode, or Sell by voice or typing).
  3. Tap Pay, pick Cash, Transfer, QRIS or Not paid yet, then save.
  4. On the Sale saved screen: Invoice, WA to send it to the buyer, or Sell again.

Receipts & WhatsApp sending Pro

Make a neat receipt with your business details and send it to the buyer over WhatsApp or as a PDF.

  1. Finish the sale in Sell, then tap Save sale.
  2. On the done screen, tap WA.
  3. No buyer number yet? Enter it and tap Send, or choose "Pick in WA" to pick the contact in WhatsApp.
  4. An older receipt: Sales › pick a receipt › WA.

Purchases: ingredients, stock & costs Pro

Record ingredient purchases, stock for sale and business costs. Scan online-shop receipts including shipping and discounts.

  1. Open Purchases on the Business Home and pick Ingredients or Stock for sale.
  2. Add the items and their prices.
  3. Tap Pay, then choose On credit (pay later).
  4. Enter the supplier and the due date, then Save. The debt is recorded under Debts.

Products & stock Pro

A product list with prices, stock and stock value. Low-stock warnings included.

  1. Open Products in the shortcut row of the Business Home (or the ⋮ menu in Sell › Product list, or More › Products and Stock), then tap Add product.
  2. Fill in the name, selling price, cost price and stock (if you want the stock tracked).
  3. Stock goes down by itself on a sale and up on a stock purchase.

Buyers, suppliers & business bills Pro

Keep buyers, suppliers and staff, see who has not paid, and remind them over WhatsApp.

  1. Open More › Business contacts.
  2. Pick the Buyers, Suppliers, Places to pay or Employees tab.
  3. Tap add for a new contact. Buyers are also saved automatically when their name is typed at the till.

Profit & loss and business reports Pro

See profit and loss, cash flow, the balance sheet, best sellers and busy hours.

  1. Open the Reports tab in Business Mode.
  2. Pick the tab you want (profit and loss, cash, products and so on) and the period.
  3. Tap Export to share the report.

Owner money (draws & capital) Pro

Record taking money out for yourself, putting capital in, or moving money to another business.

  1. Open More › Owner's Money.
  2. Pick To personal to take money out of the business (draw), or From personal for capital or a loan.
  3. Pick the business wallet and the personal wallet, enter the amount, then save. It is recorded in the business and in Personal at once.

Lend money Pro

Record business money you lend out and when it comes back.

  1. Open More › Business Settings › Lend money.
  2. Fill in From business (wallet), To (the employee or other party), the amount and when it is returned.
  3. Tap Lend. The money becomes a receivable, not a cost and not turnover.

Close the drawer & cashier recap Pro

Count the cash in the drawer, match it to your records and see the day's sales recap.

  1. Open More › Business Settings › Cashier recap, then tap Close the till under the recap.
  2. See what should be in the drawer (today's cash sales), then count the money in it (by denomination if you like).
  3. If there is a Difference, tap Book as a difference. If it is Exact, you are done.
  4. Business with several cashiers: use Cashier recap to send sales from the cashier's phone to the owner.

Business tax helper Pro

An estimate of the tax on your turnover so reporting holds no surprise.

  1. Open More › Business Settings › Business tax helper.
  2. See your gross turnover against the tax-free limit and the final SME rate limit.
  3. This is an estimate to help, not a replacement for the official calculation.

Business settings Pro

Receipt details, monthly target, wallets, categories, cashier and business reminders.

  1. Open More › Business Settings.
  2. Set up the invoice details (name, address, number), the Monthly target, wallets, categories, cashiers and reminders.
  3. From here you also find Lend money and Cashier recap (Close the till is there).

Collect what is not paid yet Pro

See the unpaid invoices, collect through WhatsApp, and record the payment when the money comes in.

  1. Open the Sales tab and pick Not fully paid, or open More › Receivables & Debts.
  2. Tap the invoice or the receivable, then collect through WhatsApp.
  3. When the money arrives, tap receive payment: fill in Received now or Pay in full, pick Goes into the wallet, then save.

Supplier credit (buy now, pay later) Pro

Buy ingredients or stock now and pay later: the debt is recorded with its due date.

  1. Open Purchases on the Business Home and add the items.
  2. Tap Pay, pick On credit (pay later).
  3. Fill in Bought at (required for credit) and Due date (3 days, 1 week or end of month).
  4. Tap Save · credit. The debt to the supplier is recorded; when you settle it, pay from that debt list.

Invoices & business details on them Pro

See every sales invoice and set the business details printed on them.

  1. All invoices are in the Sales tab; tap one, then Receipt, to view and share it.
  2. The printed name, address, number and logo are set under More › Business Settings › Business profile; ways to pay, signature and receipt size under Receipt & ways to pay.
  3. Invoices are made automatically when you record a sale; none yet? on the Business Home tap Sell.

Sales recap from employees Pro

A cashier sends the sales on their phone to the owner as a file, with no server.

  1. Open More › Business Settings › Cashier recap.
  2. On the cashier's phone pick I am the cashier then Send recap, and share the file with the owner.
  3. On the owner's phone pick I am the owner then Receive recap, open the file, check it, then record those invoices.

Monthly turnover target Pro

Set a turnover target per month and follow its progress each day on the Business Home.

  1. Open More › Business Settings › Monthly target.
  2. Fill in the Turnover target per month (the daily target is worked out for you).
  3. Turn on Show on Home to see the progress each day.

Business profile (name, logo, address, number) Pro

Business name, logo, WhatsApp number, address, kind of business and colour. Used on the receipt and reports.

  1. Open More › Business Settings › Business profile.
  2. Tap the logo circle at the top to pick a logo picture from the gallery.
  3. Fill in Business name, Business WhatsApp number and Address, then pick the Kind of business and the Business colour.
  4. Tap Save. The name, address, number and logo are printed on the receipt.

Receipt & ways to pay Pro

Set the ways to pay on the receipt (bank, e-wallet, QRIS), the note under the receipt, slogan, signature and receipt size.

  1. Open More › Business Settings › Receipt & ways to pay.
  2. Under Ways to pay tap Add for a bank, e-wallet or QRIS.
  3. Write the Note under the receipt. The slogan, signature and receipt size are in the row Slogan & signature › Set.
  4. Tap Save.

Bank account and e-wallet on the receipt Pro

Show your account or e-wallet number on the receipt so buyers know where to transfer.

  1. Open More › Business Settings › Receipt & ways to pay.
  2. Under Ways to pay tap Add, then pick the type (bank or e-wallet).
  3. Pick the bank from the buttons (or Other for your own name), then fill in Account number and Account holder.
  4. Tap Add, then Save on the Receipt & ways to pay screen. To change one tap its row, or Delete to remove it.

QRIS on the receipt (set, change, remove the picture) Pro

Put the picture of your shop QRIS on the receipt. You can change or remove it any time.

  1. Open More › Business Settings › Receipt & ways to pay.
  2. Under Ways to pay tap Add, pick QRIS, then tap Pick QRIS picture and choose it from the gallery.
  3. To change the picture: tap the QRIS row (it says "QR picture set · tap to change"), then Change picture.
  4. To remove the picture: tap the QRIS row then Remove picture. Deleting the QRIS way to pay also lets go of the picture.
  5. Tap Save.

Signature on the receipt Pro

Put a signature on the receipt: draw it with your finger or pick its photo.

  1. Open More › Business Settings › Receipt & ways to pay › Slogan & signature › Set.
  2. Under Signature tap Draw, sign the white box with your finger, then Save (Redraw to start again). Or tap Choose photo.
  3. To remove the signature tap the X button beside it.
  4. Tap Done, then Save on the Receipt & ways to pay screen.

Slogan and the note under the receipt Pro

Write your slogan and a closing line, e.g. "Thanks for your order".

  1. Open More › Business Settings › Receipt & ways to pay.
  2. Write the closing line in the Note under the receipt.
  3. For a slogan tap Slogan & signature › Set, fill in Slogan (optional) and tap Done.
  4. Tap Save.

Receipt size (A5 or 58 mm roll) Pro

Pick an A5 paper receipt or a small 58 mm roll receipt for a thermal printer.

  1. Open More › Business Settings › Receipt & ways to pay › Slogan & signature › Set.
  2. Under Receipt size pick A5 paper or 58 mm roll.
  3. Tap Done, then Save. In the receipt preview, Print always uses the 58 mm roll for a printer app.

Print, PDF, Photo or WA for a receipt Pro

A receipt can be printed, sent as a PDF, as a photo (image), or as text to the buyer on WhatsApp.

  1. Open the Sales tab, tap the receipt, then tap Receipt.
  2. The preview has four buttons: Print (58 mm roll for a printer app), PDF, Photo (a PNG image) and WA (text to the buyer).
  3. The photo of a long receipt is one whole picture. The payment QR in it is big enough to scan.

Business wallets Pro

Cash, bank and e-wallet accounts just for the business, apart from your personal wallets.

  1. Open More › Business Settings › Business wallets.
  2. Add a business wallet (cash, bank, e-wallet) or tap a wallet to change it.
  3. Business wallets are separate from your personal wallets.

Sales channels and platform fees Pro

Record sales through Shopee, GoFood and others, with the platform fee and the wallet the money goes to.

  1. Open More › Business Settings › Sales channels.
  2. Tap Add channel, fill in the Channel name (e.g. Shopee, GoFood), Fee (%) and, if you like, the wallet the money goes into. Tap Save.
  3. When selling, in Pay pick that channel under Sell through. The platform fee is filled from its percentage and can be changed per sale.

Business categories, cost of goods (COGS) and materials Pro

Set income, cost-of-goods and operating categories, and the list of materials you buy.

  1. Open More › Business Settings › Categories & materials.
  2. In Business categories, tap the label of a category to move it between cost of goods (COGS) and operating. Swipe left to delete.
  3. Pick your Kind of business in Business profile so categories and materials fill in by themselves; names that already exist are not made twice.
  4. The list of materials is under My materials: tap Material to add a new one.

Business reminders and their time Pro

Reminders for due receivables, supplier bills, low stock, regular bills and the weekly summary, with one time for all.

  1. Open More › Business Settings › Reminders.
  2. Turn on the ones you want: Receivables due (morning of the day), Supplier bills (1 day before), Low stock, Regular bills (3 days before), Weekly summary (Monday morning).
  3. Pick one Reminder time for all of them. Changes are saved at once.
  4. The Pre-order row at the bottom opens Pre-order settings (order reminders, daily limit, default deposit).

Business widget on the home screen Pro

Put a business widget on your phone home screen.

  1. Open More › Business Settings › Home screen widget.
  2. Follow your phone prompt to place the widget on the home screen.

Pre-order (orders picked up later, deposit, calendar) Pro

Take orders for a certain date with a deposit, see them on a calendar, see what has to be made, then finish them into a receipt.

  1. On the Business Home tap Sell, pick the products, then tap Pay.
  2. Tap Order picked up later (pre-order). Fill in the date and time, Pickup or Delivery, the deposit (None yet, 50%, Paid in full, or Set), the Buyer name and the Order note, then tap Save order.
  3. See all orders under More › Pre-order: the Calendar tab (the number is how many orders, tap a date; Recap to make for what has to be made) or the List (Upcoming, No DP, Done, Cancelled).
  4. Tap an order: tap the steps Making then Ready, Google Calendar to add it to your calendar, Order proof (PDF, Photo or Text) for the buyer, Remind on WA to the buyer. Done · receive the rest makes the receipt on the pickup day; the deposit becomes part of it.
  5. Cancel: the ⋮ menu › Cancel, then pick what happens to the deposit: Refunded, Forfeited (becomes Other income), or Partly. Move date is in ⋮ too.

Pre-order settings (reminders, daily limit, default deposit) Pro

Order reminders (the day before, 2 hours before pickup, deposit not paid), a daily order limit, a default deposit and adding to Google Calendar automatically.

  1. Open More › Pre-order, then tap the Settings icon at the top right. You can also use Business Settings › Reminders › Pre-order.
  2. Turn on Remind the day before (at 19:00, with the list of what to make), Remind before pickup (2 hours before), Remind about an unpaid deposit (3 days before the pickup date), and Add to Google Calendar automatically.
  3. Pick Most orders per day (Off, 3, 5, 8, 10, 15): a full day is marked on the calendar. Pick the Default deposit (30%, 50%, 70%, 100%) for new orders.
  4. Each reminder has buttons in its notification: Lihat, Yang dibuat, Google Kalender, Ingatkan WA or Tagih WA. Changes are saved at once.

Notes (money in or out you record yourself) Pro

Money in or out recorded with the Catat button shows under Sales › Notes, with a label for where it goes in the report.

  1. Tap the Catat button under the + button to record ordinary money in or out, then save.
  2. After saving you are taken to Sales › Notes. Open the Sales tab and pick Notes any time.
  3. Each note has a small label for where it goes in the report: Revenue, COGS, Cost or Non-profit (not counted as profit, e.g. Owner draw).
  4. Tap a note to change or delete it.

Business reports (their tabs) Pro

Summary, Finance, Profit & loss, Cash flow, Balance sheet, Capital & draw, Products, Buyers, Busy hours, Materials & purchases, Receivables, Channels, Year and Tax.

  1. Open the Reports tab in Business Mode.
  2. Pick a tab: Summary, Finance, Profit & loss, Cash flow, Balance sheet, Capital & draw, Products, Buyers, Busy hours, Materials & purchases, Receivables, Channels, Year or Tax.
  3. Set the period, then tap Export or PDF and CSV to share.

What the Finance cards mean (margin, break-even, cash lasts for) Pro

What Business cash now, Cash lasts for, Gross margin, Net margin, Break-even and Cost / sales mean.

  1. Open Reports › Finance and tap a card; its explanation shows, tap Got it to close.
  2. Business cash now: the sum of the balances of all your business wallets (paylater wallets are not counted).
  3. Cash lasts for: business cash divided by the average monthly cost of the 3 months before, i.e. how many months it lasts with no sales at all.
  4. Gross margin: of each Rp100 of sales, what is left after the cost of goods. Net margin: how much becomes profit after all costs.
  5. Break-even: the least sales in a month so you do not lose. Cost / sales: what share of sales goes on cost of goods and costs.

Why sales differ from money received Pro

Reports count money that really came in and went out. Unpaid receipts, owner draws and capital deposits are left out.

  1. Reports are counted from money that has come in and gone out, not from receipts alone.
  2. An unpaid receipt is counted only when its payment is received; the rest sits under Receivables.
  3. Owner draws, capital deposits, opening balances and moves between businesses are not counted as income or cost.
  4. Check Reports › Profit & loss: Gross sales, Platform fees and "Other income and receivable payments" explain the difference.

Barcode scan at the till and its sound Pro

Scan a product barcode to add it to the basket. A "tit" sounds on success and another when it is not registered; you can turn it off.

  1. On the Business Home tap Sell, then tap the Scan barcode icon.
  2. Point the camera at a product barcode; each one read goes into the basket and shows +1.
  3. A "tit" means success, a falling "tu-tut" means not registered yet (tap + Add product).
  4. Tap the speaker icon at the top (Scan sound) to turn the sound off or on. Tap Done scanning when finished.

Sell by voice or typing Pro

Say or type "2 coffee 1 bread" and the basket fills itself.

  1. On the Business Home tap Sell.
  2. Tap the Sell by voice or typing icon, then say or type the order, e.g. "2 coffee 1 bread".
  3. Check the basket that filled in, then tap Pay.

Track product stock (and negative stock) Pro

Turn on Track stock on a product so stock drops on each sale. Turn it off for services or consignment.

  1. Open More › Products, then tap the product or add a new one.
  2. Under Unit, turn on Track stock so stock drops on each sale. Turn it off for services or consignment.
  3. Stock can go below zero when you sell more than you hold; add stock through Stock purchases or change the stock on the product.

Move money between business wallets or to another business Pro

Move money between business wallets (e.g. withdraw Shopee balance) or to your other business. It is not counted as sales.

  1. Open More › Move business money (in Business Mode).
  2. Pick Between business wallets or To another business, then the source wallet and the target wallet (or your other business).
  3. The admin fee, if any, is recorded as a cost. The move is not counted as sales.

Combined summary (Personal + all businesses) Pro

See your personal money and all your businesses side by side.

  1. Open More › Combined summary.
  2. See your Personal money and all your businesses side by side; it is only for looking.

Create a new business and switch profile Pro

More than one business? Create a new one and switch between Personal and your businesses.

  1. Tap the profile pill at the top of the Home (or More › Switch profile).
  2. Pick Personal, Combined, or one of your businesses. Tap New business to create another one.
  3. To rename or delete a business, use Rename or Delete business in that list.

Making your first sale Pro

  1. Open More › Switch profile, then create a new business (or pick yours) and follow the setup.
  2. Add products: More › Products and Stock › Add product (name, selling price, cost, stock if tracked).
  3. On the Business Home tap Sell, tap the product (or Custom item), then Pay and pick Cash, Transfer or QRIS.
  4. On the Sale saved screen: Invoice, WA to send it to the buyer, or Sell again.

Recording customer credit and collecting it Pro

  1. In Sell, fill the basket then tap Pay and pick Pay later. Fill in the customer name (required for unpaid sales).
  2. Save. The sale becomes a receivable. See them all in the Sales tab › Not fully paid.
  3. To collect, tap the invoice and send it through WhatsApp.
  4. When the money arrives, receive the payment: fill in Received now or Pay in full, pick Goes into the wallet, then save.

Closing the till every day Pro

  1. Open More › Business Settings › Cashier recap, then tap Close the till under the recap.
  2. See what should be in the drawer (today's cash sales), then count the money in it (by denomination if you like).
  3. If there is a Difference, tap Book as a difference. If it is Exact, you are done.
  4. See today's result in the Sales tab and the Business Home.

Recording employee pay Pro

  1. A fixed monthly cost: More › Recurring Transactions › add, Expense, the salary Amount, the business wallet, Category Employee Pay, Frequency Monthly, Start from payday.
  2. Or record it once: Business Home › Purchases, pick Costs, fill in the pay, then Pay.
  3. To lend money to an employee: More › Business Settings › Lend money.
  4. See the effect on profit in the Reports tab › profit and loss.

Taking business money for yourself Pro

  1. Open More › Owner's Money.
  2. Pick To personal, then the source business wallet and the personal wallet it goes to.
  3. Enter the amount (Artosku shows this month's profit and what stays in the business), then save.
  4. It is recorded as a draw in the business and as income in Personal at once, not as a cost.

Checking this month's profit Pro

  1. Open the Reports tab in Business Mode.
  2. Pick the profit and loss tab and the period (this month).
  3. See turnover, costs and profit. Tap Export to share the report.
  4. Quickly without opening the report: the Business Home shows today's profit, and More › Business Settings › Monthly target helps follow turnover.

Sending a receipt with your QRIS on it Pro

  1. Open More › Business Settings › Receipt & ways to pay. Under Ways to pay tap Add, pick QRIS, then Pick QRIS picture from the gallery. Tap Save.
  2. Make the sale from the Business Home › Sell.
  3. Open the Sales tab, tap the receipt, then tap Receipt.
  4. Send it as PDF, Photo (a PNG image, its QR is big enough to scan) or WA (text). To change the QRIS picture: tap the QRIS row in Receipt & ways to pay › Change picture.

Recording ingredient purchases and seeing the COGS Pro

  1. On the Business Home open Purchases, pick Ingredients or Stock for sale, add the items and their prices, then Pay and Save.
  2. Ingredient and stock purchases go in the report as Cost of goods (COGS). Which categories count as COGS is set under More › Business Settings › Categories & materials (tap a category label to move it between cost of goods and operating).
  3. See the COGS in Reports › Profit & loss (the Cost of goods row; tap it to see its categories, tap a category to see its notes).

Taking an order for a certain date with a deposit Pro

  1. On the Business Home tap Sell, pick the products, tap Pay, then Order picked up later (pre-order).
  2. Fill in the pickup date and time, Pickup or Delivery, the deposit (e.g. 50%), the Buyer name and the Order note (e.g. what is written on the cake). Tap Save order · deposit.
  3. See the date under More › Pre-order › Calendar; Recap to make shows what has to be made.
  4. At pickup open the order and tap Done · receive the rest. The receipt is made on the pickup day and the deposit becomes part of it.

Recording a business cost and seeing where it goes Pro

  1. Tap the Catat button under the + button (or + › Pay a cost), pick Expense, fill in the amount and category, then save.
  2. Under the category a line says "Goes in the report as ..." (COGS, Operating cost, or Not counted in profit).
  3. After saving you are taken to Sales › Notes. Tap the note to change or delete it.

Nothing found. Try another word, or go back to Start here.

Ready to try it?

Free on Google Play.

Download on Google Play